RaspberryPi 3 使用笔记
目录
0. 准备 #
- Raspberry Pi 3 Model B
- 32GB Class10 TF 卡(官方推荐 8GB 以上)和读卡器
- 5V2A USB 电源,比如 iPad 电源适配器
- microUSB 电源线
- HDMI 数据线
- 显示器
- USB 键盘
1. 安装系统 #
下载 Raspbian jessie lite :2017-04-10-raspbian-jessie-lite.img ,这是一个官方支持的精简系统,基于 Debian 开发,只有文本界面。
将 TF 卡插入 MacBook ,在终端里用 df 命令可以看到 TF 卡已经被挂载:
[22:16]~/ ❯ df
Filesystem    512-blocks      Used Available Capacity iused      ifree %iused  Mounted on
/dev/disk1     487830528 299357448 187961080    62% 1687373 4293279906    0%   /
devfs                377       377         0   100%     654          0  100%   /dev
map -hosts             0         0         0   100%       0          0  100%   /net
map auto_home          0         0         0   100%       0          0  100%   /home
/dev/disk3s1    60612608    226616  60385992     1%      76 4294967203    0%   /Volumes/Pi
然后卸载:
[22:39]~/ ❯ diskutil unmount /dev/disk3s1
Volume Pi on disk3s1 unmounted
使用 dd 命令将系统镜像写入:
[23:43]~/ ❯ sudo dd bs=4m if=2017-04-10-raspbian-jessie-lite.img of=/dev/rdisk3
Password:
309+1 records in
309+1 records out
1297862656 bytes transferred in 112.203648 secs (11567027 bytes/sec)
/dev/disk3s1 是分区,/dev/disk3 是块设备,/dev/rdisk3 是原始字符设备
这样就安装系统好了,再次卸载:
[23:45]~/ ❯ df
Filesystem    512-blocks      Used Available Capacity iused      ifree %iused  Mounted on
/dev/disk1     487830528 299358472 187960056    62% 1687450 4293279829    0%   /
devfs                380       380         0   100%     658          0  100%   /dev
map -hosts             0         0         0   100%       0          0  100%   /net
map auto_home          0         0         0   100%       0          0  100%   /home
/dev/disk3s1       82644     41524     41120    51%       0          0  100%   /Volumes/boot
[23:49]~/ ❯ diskutil unmount /dev/disk3s1
Volume boot on disk3s1 unmounted
2. 第一次启动 #
将 TF 卡插入树莓派,连接电源、显示器、键盘,即可启动。启动后输入用户名 pi ,密码 raspberry 。
2.1. 配置语言、时区和键盘布局 #
执行 sudo raspi-config ,进入 4 Localisation Options ,对系统进行本地化配置:
- 在
I1 Change Locale中设置本地语言,取消en_GB.UTF-8 UTF-8,选中en_US.UTF-8 UTF-8。 - 在
I2 Change Timezone中设置时区为Asia下的Shanghai。 - 在
I3 Change Keyboard Layout设置键盘布局,依次选择Generic 104-key PC>Other>English (US)>English (US)>The default for the keyboard layout>No compose key。 - 在
I4 Change Wi-fi Country中设置CN China - 完成配置后,选择
Finish,根据提示重启系统,如果没有提示,可以执行sudo reboot重启系统。
2.2. 配置 Wi-Fi #
执行 wpa_passphrase [ssid] [password] 命令将 Wi-Fi 名称和密码写入配置文件:
pi@raspberrypi:~ $ sudo wpa_passphrase TP-Link_30BBB8 12345678 | sudo tee -a /etc/wpa_supplicant/wpa_supplicant.conf
重启一下系统,就可以连上 Wi-Fi 了,使用 iwconfig 命令查看连接是否成功,已经获取的 IP :
pi@raspberrypi:~ $ iwconfig
wlan0     IEEE 802.11bgn  ESSID:"TP-Link_30BBB8"
          Mode:Managed  Frequency:2.412 GHz  Access Point: 8C:A6:DF:0C:7A:09
          Bit Rate=28.8 Mb/s   Tx-Power=31 dBm
          Retry short limit:7   RTS thr:off   Fragment thr:off
          Power Management:on
          Link Quality=44/70  Signal level=-66 dBm
          Rx invalid nwid:0  Rx invalid crypt:0  Rx invalid frag:0
          Tx excessive retries:2  Invalid misc:0   Missed beacon:0

lo        no wireless extensions.

eth0      no wireless extensions.
pi@raspberrypi:~ $ ifconfig
eth0      Link encap:Ethernet  HWaddr b8:27:eb:11:9b:de
          inet6 addr: fe80::3f3:df2a:426d:ab83/64 Scope:Link
          UP BROADCAST MULTICAST  MTU:1500  Metric:1
          RX packets:0 errors:0 dropped:0 overruns:0 frame:0
          TX packets:0 errors:0 dropped:0 overruns:0 carrier:0
          collisions:0 txqueuelen:1000
          RX bytes:0 (0.0 B)  TX bytes:0 (0.0 B)

lo        Link encap:Local Loopback
          inet addr:127.0.0.1  Mask:255.0.0.0
          inet6 addr: ::1/128 Scope:Host
          UP LOOPBACK RUNNING  MTU:65536  Metric:1
          RX packets:0 errors:0 dropped:0 overruns:0 frame:0
          TX packets:0 errors:0 dropped:0 overruns:0 carrier:0
          collisions:0 txqueuelen:1
          RX bytes:0 (0.0 B)  TX bytes:0 (0.0 B)

wlan0     Link encap:Ethernet  HWaddr b8:27:eb:44:ce:8b
          inet addr:192.168.1.103  Bcast:192.168.1.255  Mask:255.255.255.0
          inet6 addr: fe80::dba8:37ce:716a:a85/64 Scope:Link
          UP BROADCAST RUNNING MULTICAST  MTU:1500  Metric:1
          RX packets:4429 errors:0 dropped:34 overruns:0 frame:0
          TX packets:160 errors:0 dropped:0 overruns:0 carrier:0
          collisions:0 txqueuelen:1000
          RX bytes:327762 (320.0 KiB)  TX bytes:27347 (26.7 KiB)
2.3. 开启 SSH #
系统默认没有开启 SSH ,需要在 TF 卡的根目录下新建一个空文件 SSH ,这样系统启动时就会启动 SSH :
pi@raspberrypi:~ $ sudo touch /boot/ssh
pi@raspberrypi:~ $ sudo reboot
查看 SSH 服务是否启动:
pi@raspberrypi:~ $ systemctl status ssh
● ssh.service - OpenBSD Secure Shell server
   Loaded: loaded (/lib/systemd/system/ssh.service; enabled)
   Active: active (running) since Mon 2017-04-10 19:16:40 CST; 2min 2s ago
 Main PID: 697 (sshd)
   CGroup: /system.slice/ssh.service
           └─697 /usr/sbin/sshd -D
在 Mac 的终端里执行 ssh pi@192.168.1.103 登录树莓派。
可以安装一个 lrzsz ,方便服务器端与客户端的文件传输:
sudo apt-get install lrzsz
2.4. 更换源 #
编辑配置文件:
pi@raspberrypi:~ $ sudo vi /etc/apt/sources.list
注释掉原地址,添加阿里云的源地址:
deb http://mirrors.aliyun.com/raspbian/raspbian/ wheezy main non-free contrib
deb-src http://mirrors.aliyun.com/raspbian/raspbian/ wheezy main non-free contrib
保存文件后,更新系统软件:
pi@raspberrypi:~ $ sudo apt-get update
清华的源速度也不错:
deb http://mirrors.tuna.tsinghua.edu.cn/raspbian/raspbian/ jessie main non-free contrib
deb-src http://mirrors.tuna.tsinghua.edu.cn/raspbian/raspbian/ jessie main non-free contrib
2.5. 替换 Vim #
系统原装的 Vim 超难用,先卸载,再按照新的:
pi@raspberrypi:~ $ sudo apt-get remove vim-common
pi@raspberrypi:~ $ sudo apt-get install vim
2.6. 设置 SSH 证书登录 #
暴露在外围的密码登录容易受到攻击,而且每次都要输密码,不够方便。真正生产环境中还是使用证书登录。配置需要如下几个步骤。
生成一对秘钥,一路回车默认生成id_rsa和id_rsa.pub,前者是私钥,放在客户端,后者是公钥,需要放在ssh服务器:
 pi@raspberrypi:~ $ ssh-keygen -t rsa
 Generating public/private rsa key pair.
 Enter file in which to save the key (/home/pi/.ssh/id_rsa):
 Created directory '/home/pi/.ssh'.
 Enter passphrase (empty for no passphrase):
 Enter same passphrase again:
 Your identification has been saved in /home/pi/.ssh/id_rsa.
 Your public key has been saved in /home/pi/.ssh/id_rsa.pub.
 The key fingerprint is:
 63:c8:76:52:c1:14:bc:1b:8b:28:b2:02:7d:86:96:8f pi@raspberrypi
 The key's randomart image is:
 +---[RSA 2048]----+
 |       ++.       |
 |        o.       |
 |        ..       |
 |     . oo        |
 | . o .=.S+       |
 |o * +..+o.       |
 |.+ *             |
 |o E .            |
 |.                |
 +-----------------+
 pi@raspberrypi:~ $ cd .ssh/
 pi@raspberrypi:~/.ssh $ ls
 id_rsa  id_rsa.pub
在服务器端将 id_rsa.pub 添加到 authorized_keys ,然后配置 ssh_config
 pi@raspberrypi:~/.ssh $ cat id_rsa.pub >> ~/.ssh/authorized_keys
 pi@raspberrypi:~ $ vim /etc/ssh/ssh_config
 RSAAuthentication yes
 PubkeyAuthentication yes
 AuthorizedKeysFile  %h/.ssh/authorized_keys
把私钥 id_rsa 发送到客户端,由于我是 MacOS ,放在 ~/.ssh/ 目录下,更名为 raspberry_pi ,在 ~/.ssh/config 文件中添加一项配置:
 host pi
 HostName 192.168.1.103
 Port 22
 User pi
 IdentityFile ~/.ssh/raspberry_pi
在客户端使用
ssh pi即可登录树莓派。
2.7. 系统时间 #
树莓派没有实时时钟,所以每次启动后要用 ntp 对时,否则时间不准。默认设置的 ntp 服务器连接较慢,可以添加一些境内的 ntp 服务器。编辑 /etc/ntp.conf 文件,找到如下两行:
# You do need to talk to an NTP server or two (or three).
#server ntp.your-provider.example
在这行后面添加:
server ntp.fudan.edu.cn iburst
server time.asia.apple.com iburst
server asia.pool.ntp.org iburst
server ntp.nict.jp iburst
server time.nist.gov iburst
保存后重启 ntpd :
pi@raspberrypi:~ $ sudo systemctl restart ntp.service
2.8. 配置以太网 #
树莓派有一个以太网卡 eth0 ,默认是 dhcp 方式自动分配 IP ,要改成静态 IP 需要编辑 /etc/network/interfaces 文件,将 eth0 的配置删除,添加如下内容:
auto eth0
iface eth0 inet static
    address 192.168.5.252
    netmask 255.255.255.0
    gateway 192.168.5.50
    dns-nameservers 192.168.0.99
保存后重启 network 服务:
pi@raspberrypi:~ $ sudo systemctl restart networking.service
3. 硬件编程开发 #
树莓派通过 40 pin 排针引出 26 路 GPIO ,输出高电平 3.3V ,部分 GPIO 有复用功能,包括一个两线 I2C ,一个四线 SPI ,一个 UART ,信号定义如下:

读写 GPIO 可以用 C 语言或者 Python ,官方推荐的 Python GPIO 是一个小型 Python 库,但是不支持 SPI 、I2C 等 GPIO 的复用功能,使用 C 语言开发的 WiringPi 更受欢迎:http://wiringpi.com/ ,它提供了一个 C 语言开发库, API 风格类似 Arduino ,可以访问 GPIO 管脚的所有功能,还提供了一个命令行工具 gpio ,可以直接访问 GPIO 管脚。
3.1. 下载安装 #
先按照 git ,然后通过 git 下载源码:
pi@raspberrypi:~ $ sudo apt-get install git
pi@raspberrypi:~ $ git clone git://git.drogon.net/wiringPi
安装:
pi@raspberrypi:~ $  cd ~/wiringPi
pi@raspberrypi:~ $  ./build
测试是否安装成功:
pi@raspberrypi:~/wiringPi $ gpio -v
gpio version: 2.44
Copyright (c) 2012-2017 Gordon Henderson
This is free software with ABSOLUTELY NO WARRANTY.
For details type: gpio -warranty

Raspberry Pi Details:
    Type: Pi 3, Revision: 02, Memory: 1024MB, Maker: Sony
    * Device tree is enabled.
    * --> Raspberry Pi 3 Model B Rev 1.2
    * This Raspberry Pi supports user-level GPIO access.
3.2. WiringPi 的管脚编码 #
WiringPi 的 GPIO 管脚编号与连接器上的硬件硬件编号并不一致,获取当前树莓派的 GPIO 管脚描述的方法是使用 gpio 命令:
pi@raspberrypi:~/wiringPi $ gpio readall
 +-----+-----+---------+------+---+---Pi 3---+---+------+---------+-----+-----+
 | BCM | wPi |   Name  | Mode | V | Physical | V | Mode | Name    | wPi | BCM |
 +-----+-----+---------+------+---+----++----+---+------+---------+-----+-----+
 |     |     |    3.3v |      |   |  1 || 2  |   |      | 5v      |     |     |
 |   2 |   8 |   SDA.1 |   IN | 1 |  3 || 4  |   |      | 5v      |     |     |
 |   3 |   9 |   SCL.1 |   IN | 1 |  5 || 6  |   |      | 0v      |     |     |
 |   4 |   7 | GPIO. 7 |   IN | 1 |  7 || 8  | 0 | IN   | TxD     | 15  | 14  |
 |     |     |      0v |      |   |  9 || 10 | 1 | IN   | RxD     | 16  | 15  |
 |  17 |   0 | GPIO. 0 |   IN | 0 | 11 || 12 | 0 | IN   | GPIO. 1 | 1   | 18  |
 |  27 |   2 | GPIO. 2 |   IN | 0 | 13 || 14 |   |      | 0v      |     |     |
 |  22 |   3 | GPIO. 3 |   IN | 0 | 15 || 16 | 0 | IN   | GPIO. 4 | 4   | 23  |
 |     |     |    3.3v |      |   | 17 || 18 | 0 | IN   | GPIO. 5 | 5   | 24  |
 |  10 |  12 |    MOSI |   IN | 0 | 19 || 20 |   |      | 0v      |     |     |
 |   9 |  13 |    MISO |   IN | 0 | 21 || 22 | 0 | IN   | GPIO. 6 | 6   | 25  |
 |  11 |  14 |    SCLK |   IN | 0 | 23 || 24 | 1 | IN   | CE0     | 10  | 8   |
 |     |     |      0v |      |   | 25 || 26 | 1 | IN   | CE1     | 11  | 7   |
 |   0 |  30 |   SDA.0 |   IN | 1 | 27 || 28 | 1 | IN   | SCL.0   | 31  | 1   |
 |   5 |  21 | GPIO.21 |   IN | 1 | 29 || 30 |   |      | 0v      |     |     |
 |   6 |  22 | GPIO.22 |   IN | 1 | 31 || 32 | 0 | IN   | GPIO.26 | 26  | 12  |
 |  13 |  23 | GPIO.23 |   IN | 0 | 33 || 34 |   |      | 0v      |     |     |
 |  19 |  24 | GPIO.24 |   IN | 0 | 35 || 36 | 0 | IN   | GPIO.27 | 27  | 16  |
 |  26 |  25 | GPIO.25 |   IN | 0 | 37 || 38 | 0 | IN   | GPIO.28 | 28  | 20  |
 |     |     |      0v |      |   | 39 || 40 | 0 | IN   | GPIO.29 | 29  | 21  |
 +-----+-----+---------+------+---+----++----+---+------+---------+-----+-----+
 | BCM | wPi |   Name  | Mode | V | Physical | V | Mode | Name    | wPi | BCM |
 +-----+-----+---------+------+---+---Pi 3---+---+------+---------+-----+-----+
这个命令会生成一张图片,描述当前树莓派的 GPIO 连接器管脚与 WiringPi 中的管脚编号的映射关系,上图是 Raspberry Pi 3 Model B 型的。
3.3. GPIO #
WiringPi 提供了多个初始化函数:
- int wiringPiSetup (void) ;
- int wiringPiSetupGpio (void) ;
- int wiringPiSetupPhys (void) ;
- int wiringPiSetupSys (void) ;
程序开始的时候,必须调用其中一个,且需要 root 权限。通常调用 wiringPiSetup(void) 即可,它的作用是初始化 WiringPi 编程环境和 GPIO 管脚映射。wiringPiSetupGpio(void) 和 wiringPiSetupPhys(void) 会用树莓派的 GPIO 编号或者连接器管脚编号替代 WiringPi 的编号,wiringPiSetupSys(void) 会用 /sys/class/gpio 接口来代替直接访问硬件,也称为 sys 模式,这三个函数都很少使用。
访问 GPIO 主要需要如下函数,这些函数在 sys 模式下都是无效的:
- void pinMode (int pin, int mode) ;
设置某个管脚的模式为 INPUT, OUTPUT, PWM_OUTPUT 或者 GPIO_CLOCK 。只有 wiringPi pin 1 (BCM_GPIO 18) 支持 PWM 输出 ,只有 wiringPi pin 7 (BCM_GPIO 4) 支持 CLOCK 输出。
- void pullUpDnControl (int pin, int pud) ;
设置某个输入管脚的上拉和下拉电阻,PUD_OFF 表示关闭上下拉电阻, PUD_DOWN 表示下拉到地,PUD_UP 表示上拉倒 3.3V ,上下拉电阻大约 50KΩ 。
- void digitalWrite (int pin, int value) ;
向某个输出管脚写值,HIGH 表示高电平, LOW 表示低电平。
- int digitalRead (int pin) ;
读取某个输入管脚的状态,返回 HIGH 表示高电平,LOW 表示低电平。
3.4. SPI #
编程访问 SPI 前,要用 gpio 加载 SPI 驱动:
gpio load spi
编辑代码时要包含头文件:
#include <wiringPiSPI.h>
编译时要手动链接 : -lwiringPi 。
3.5. UART #
4. 搭建 NAS 服务 #
4.1. 硬件配置 #
准备一块移动硬盘,因为树莓派的 USB 口驱动能力有限,最好用双 USB 口数据线,为移动硬盘独立供电,格式化为 ext4 ,我这里的分区是 sda1 :
pi@raspberrypi:~ $ sudo fdisk /dev/sda -l

Disk /dev/sda: 149.1 GiB, 160041885696 bytes, 312581808 sectors
Units: sectors of 1 * 512 = 512 bytes
Sector size (logical/physical): 512 bytes / 512 bytes
I/O size (minimum/optimal): 512 bytes / 512 bytes
Disklabel type: dos
Disk identifier: 0x9fd95492

Device     Boot Start       End   Sectors   Size Id Type
/dev/sda1        2048 312581807 312579760 149.1G 83 Linux
为了让系统启动时自动挂在移动硬盘,需要修改 /etc/fstab 文件,添加 sda1 的配置,记得修改前先备份:
pi@raspberrypi:/etc $ cat fstab
proc            /proc           proc    defaults          0       0
PARTUUID=5b2de8de-01  /boot           vfat    defaults          0       2
PARTUUID=5b2de8de-02  /               ext4    defaults,noatime  0       1
/dev/sda1             /home/pi/nas    ext4    defaults,noatime  0       0
# a swapfile is not a swap partition, no line here
#   use  dphys-swapfile swap[on|off]  for that
创建挂在目录:
pi@raspberrypi:~ $ mkdir /home/pi/nas
重启后查看挂载信息:
pi@raspberrypi:~ $ df
Filesystem     1K-blocks    Used Available Use% Mounted on
/dev/root       29787900 1959324  26593012   7% /
devtmpfs          469532       0    469532   0% /dev
tmpfs             473864       0    473864   0% /dev/shm
tmpfs             473864   12260    461604   3% /run
tmpfs               5120       4      5116   1% /run/lock
tmpfs             473864       0    473864   0% /sys/fs/cgroup
/dev/mmcblk0p1     41322   20763     20559  51% /boot
/dev/sda1      153705340   60864 145813600   1% /home/pi/nas
4.2. 文件共享 #
Samba 可以实现树莓派上的文件在局域网内的共享。安装必要的文件:
pi@raspberrypi:~ $ sudo apt-get install samba samba-common-bin -y
如果分区是 NTFS 格式,需要安装 NTFS 支持:
sudo apt-get install ntfs-3g。如果是 exFAT 格式,则选用安装 exfat-utils 。
创建共享文件夹 shares:
pi@raspberrypi:~ $ sudo mkdir /home/pi/nas/shares
编辑配置文件 /etc/samba/smb.conf ,替换成如下内容:
[global]
security = user
encrypt passwords = true
guest account = nobody
map to guest = bad user

#======================= Share Definitions =======================
[share]
comment = Guest access shares
path = /home/pi/nas/shares/
browseable = yes
writable = yes
#read only = yes
guest ok = yes
public = yes

[NAS-Data]
comment = Nas data folder
path = /home/pi/nas/
browseable = yes
writable = yes
valid users = root pi
需要为 samba 添加一个 pi 账户:
pi@raspberrypi:~/nas $ sudo smbpasswd -a pi
New SMB password:
Retype new SMB password:
Added user pi.
重启 samba 服务,确保启动成功:
pi@raspberrypi:~/nas $ sudo systemctl restart smbd.service
pi@raspberrypi:~/nas $ sudo systemctl status smbd.service
● smbd.service - LSB: start Samba SMB/CIFS daemon (smbd)
   Loaded: loaded (/etc/init.d/smbd)
   Active: active (running) since Mon 2017-04-10 19:17:04 CST; 2s ago
  Process: 5272 ExecStop=/etc/init.d/smbd stop (code=exited, status=0/SUCCESS)
  Process: 5122 ExecReload=/etc/init.d/smbd reload (code=exited, status=0/SUCCESS)
  Process: 5313 ExecStart=/etc/init.d/smbd start (code=exited, status=0/SUCCESS)
   CGroup: /system.slice/smbd.service
           ├─5324 /usr/sbin/smbd -D
           └─5329 /usr/sbin/smbd -D

Apr 10 19:17:04 raspberrypi smbd[5313]: Starting SMB/CIFS daemon: smbd.
Apr 10 19:17:04 raspberrypi systemd[1]: Started LSB: start Samba SMB/CIFS daemon (smbd).
Apr 10 19:17:04 raspberrypi smbd[5324]: [2017/04/10 19:17:04.479386,  0] ../lib/util/become_daemon.c:124(daemon_ready)
Apr 10 19:17:04 raspberrypi smbd[5324]: STATUS=daemon 'smbd' finished starting up and ready to serve connections
在 MAC 中打开 Finder > 前往 > 网络 ,就可以看到树莓派的共享文件夹,访问 share 共享目录无需密码,而 NAS-Data 需要密码验证:

4.3. FTP 服务器 #
在树莓派上安装 vsftpd :
pi@raspberrypi:~ $ sudo apt-get install vsftpd
编辑配置文件 /etc/vsftpd.conf ,修改如下选项:
#禁止匿名访问
anonymous_enable=NO
#设定本地用户可以访问
local_enable=YES
#设定可以进行写操作
write_enable=YES
#设定上传后文件的权限掩码
local_umask=022
#设定根目录
local_root=/home/pi/
用 ftp 客户端软件登录:
5. 移植 UCI #
UCI 是 OpenWRT 的一个配置工具,提供 C 语言 API 和 Shell 命令接口,可以方便的自定义配置文件。uci 的编译需要 CMake ,先安装 CMake :
pi@raspberrypi:~ $ sudo apt-get install cmake
安装 libluajit-dev ,否则会出现 lauxlib.h: No such file or directory 这样的错误 :
pi@raspberrypi:~ $ sudo apt-get install libluajit-5.1-dev
通过 git 下载 uci 的源码包:
pi@raspberrypi:~ $ git clone https://github.com/jkjuopperi/uci.git
用 pkg-config 查询刚才的 libluajit-dev 的头文件目录:
pi@raspberrypi:~ $ pkg-config --cflags --libs luajit
-I/usr/include/luajit-2.0 -lluajit-5.1
然后进入 uci 目录,在 CMakeLists.txt 文件中靠前位置添加如下一行,指定头文件目录,否则编译的时候找不到:
INCLUDE_DIRECTORIES("/usr/include/luajit-2.0/")
保存后开始编译安装:
pi@raspberrypi:~/uci $ cmake  .
pi@raspberrypi:~/uci $ make
pi@raspberrypi:~/uci $ sudo make install
[ 27%] Built target uci-static
[ 54%] Built target uci-shared
[ 63%] Built target cli
[ 72%] Built target cli-static
[ 81%] Built target ucimap
[ 90%] Built target ucimap-example
[100%] Built target uci_lua
Install the project...
-- Install configuration: ""
-- Installing: /usr/local/include/uci.h
-- Installing: /usr/local/include/uci_config.h
-- Installing: /usr/local/include/ucimap.h
-- Installing: /usr/local/lib/libuci.so
-- Installing: /usr/local/lib/libuci.a
-- Installing: /usr/local/bin/uci
-- Set runtime path of "/usr/local/bin/uci" to ""
-- Installing: /usr/local/bin/uci-static
-- Installing: /usr/local/lib/lua/5.1/uci.so
-- Set runtime path of "/usr/local/lib/lua/5.1/uci.so" to ""
安装后需要执行一次 sudo ldconfig -v,否则可能找不到新装的库文件,uci 默认将配置文件放在 /etc/config 目录下,所以新建该目录,执行 uci ,如下表示安装成功:
pi@raspberrypi:~/uci $ uci
Usage: uci [<options>] <command> [<arguments>]

Commands:
        batch
        export     [<config>]
        import     [<config>]
        changes    [<config>]
        commit     [<config>]
        add        <config> <section-type>
        add_list   <config>.<section>.<option>=<string>
        show       [<config>[.<section>[.<option>]]]
        get        <config>.<section>[.<option>]
        set        <config>.<section>[.<option>]=<value>
        delete     <config>[.<section[.<option>]]
        rename     <config>.<section>[.<option>]=<name>
        revert     <config>[.<section>[.<option>]]
        reorder    <config>.<section>=<position>

Options:
        -c <path>  set the search path for config files (default: /etc/config)
        -d <str>   set the delimiter for list values in uci show
        -f <file>  use <file> as input instead of stdin
        -L         do not load any plugins
        -m         when importing, merge data into an existing package
        -n         name unnamed sections on export (default)
        -N         don't name unnamed sections
        -p <path>  add a search path for config change files
        -P <path>  add a search path for config change files and use as default
        -q         quiet mode (don't print error messages)
        -s         force strict mode (stop on parser errors, default)
        -S         disable strict mode
        -X         do not use extended syntax on 'show'
6. Web 开发 #
使用 Django + Nginx 搭建一个静态站点。
6.1. 安装 Nginx #
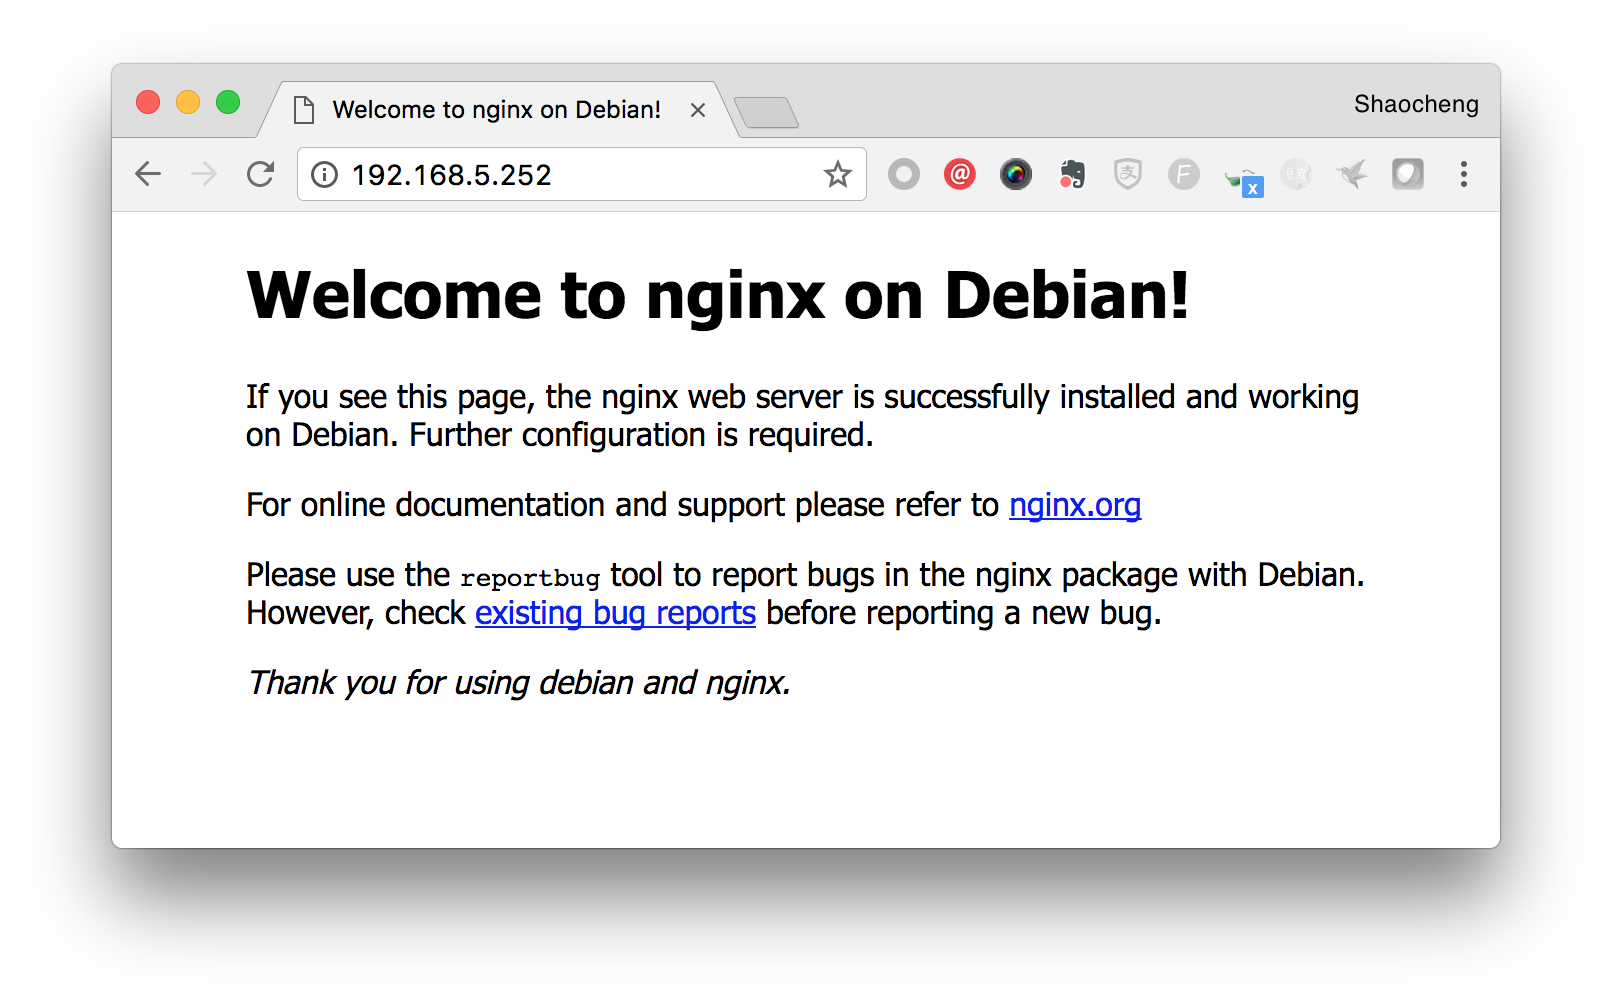
安装 nginx ,安装后会自动启动:
pi@raspberrypi:~ $ sudo apt-get install nginx
pi@raspberrypi:~ $ systemctl status nginx.service
â— nginx.service - A high performance web server and a reverse proxy server
Loaded: loaded (/lib/systemd/system/nginx.service; enabled)
Active: active (running) since Tue 2017-09-26 22:32:43 CST; 16h ago
Main PID: 756 (nginx)
CGroup: /system.slice/nginx.service
├─756 nginx: master process /usr/sbin/nginx -g daemon on; master_process on;
├─757 nginx: worker process
├─758 nginx: worker process
├─759 nginx: worker process
└─760 nginx: worker process
通过浏览器访问树莓派的 IP ,可以如下页面:
6.2. 安装 Django #
先安装 pip :
pi@raspberrypi:~ $ curl  https://bootstrap.pypa.io/get-pip.py -o get-pip.py
pi@raspberrypi:~ $ sudo python  get-pip.py
然后安装 Django 框架:
pi@raspberrypi:~ $ sudo pip install django
6.3. 安装 uWSGI #
安装 python-dev ,否则下一步安装 uwsgi 会失败:
pi@raspberrypi:~ $ sudo apt-get install python-dev
安装 uwsgi :
pi@raspberrypi:~ $ sudo pip install uwsgi
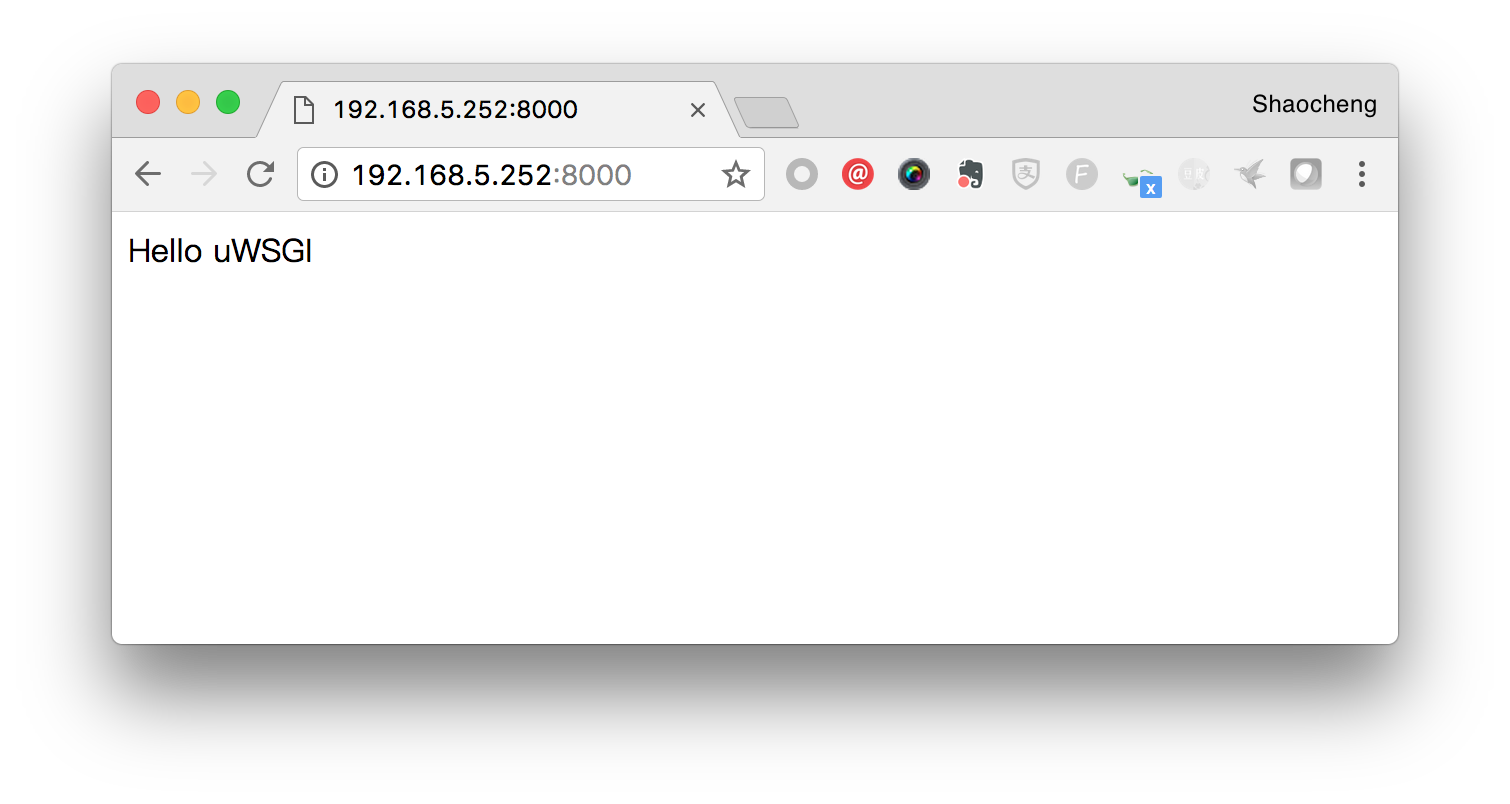
新建一个 test.py 文件,写入如下代码:
# test.py
def application(env, start_response):
    start_response('200 OK', [('Content-Type','text/html')])
    return ["Hello uWSGI"] # python2
保存后执行:
pi@raspberrypi:~ $ uwsgi --http :8000 --wsgi-file test.py
打开浏览器,访问 http://localhost_ip:8000 ,显示 Hello uWSGI,说明 Web client - uWSGI - Python 三个环节是畅通的: