Yocto 学习笔记
·252 字·2 分钟
目录
0. Quick Start #
构建一个 yocto 系统镜像的基本流程如下:
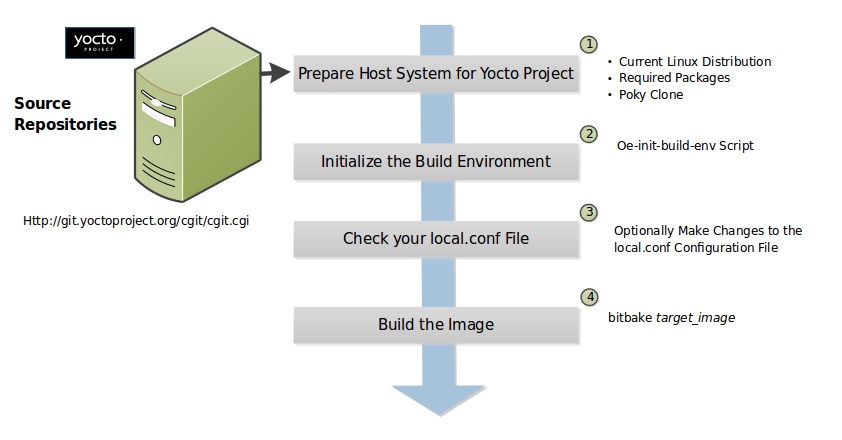
- 准备宿主机系统,安装必要的开发工具。
- 初始化构建环境,通常是利用 oe-init-build-env 脚本,默认会新建一个构建目录 build 。
- 编辑 build/conf/local.conf 文件,确认 MACHINE 变量,为
- 开始构建系统镜像,最终的镜像文件会生成在 build/tmp/deploy/images/ 目录下。
先在宿主机安装 Ubuntu Server 18.04 ,至少预留 50GB 硬盘空间,推荐 100GB ,然后安装如下软件包:
$ sudo apt-get install gawk wget git-core diffstat unzip texinfo gcc-multilib build-essential chrpath socat cpio python python3 python3-pip python3-pexpect xz-utils debianutils iputils-ping libsdl1.2-dev xterm
用 git 克隆一份 yocto 源码:
$ git clone git://git.yoctoproject.org/poky
Cloning into 'poky'...
remote: Counting objects: 367178, done.
remote: Compressing objects: 100% (88161/88161), done.
remote: Total 367178 (delta 272761), reused 366942 (delta 272525)
Receiving objects: 100% (367178/367178), 133.26 MiB | 6.40 MiB/s, done.
Resolving deltas: 100% (272761/272761), done.
Checking connectivity... done.
$ cd poky/
$ git status
On branch master
Your branch is up to date with 'origin/master'.
nothing to commit, working tree clean
$ git branch  -a
* master
  remotes/origin/1.1_M1
  remotes/origin/1.1_M2
  ...
  remotes/origin/1.6_M5
  remotes/origin/HEAD -> origin/master
  remotes/origin/bernard
  ...
  remotes/origin/rocko
  remotes/origin/rocko-next
  remotes/origin/sumo
  remotes/origin/sumo-next
克隆到本地的仓库处于 master 分支,在这里可以看到 yocto 的版本发行记录,我们应该检出当前的版本 2.4.2(Rocko) :
$ git checkout -b rocko origin/rocko
Branch 'rocko' set up to track remote branch 'rocko' from 'origin'.
Switched to a new branch 'rocko'
$ git branch
  master
* rocko
每个分支内又有很多 tags ,先查看当前的版本和 tag 信息:
$ git describe
rocko-18.0.2-105-g701cc0009f
$ git show rocko-18.0.2
tag rocko-18.0.2
Tagger: Tracy Graydon <tracy.graydon@intel.com>
Date:   Mon Mar 12 14:51:03 2018 -0700

Tagging for yocto-2.4.2
... ...
commit 342fbd6a3e57021c8e28b124b3adb241936f3d9d (tag: yocto-2.4.2, tag: rocko-18.0.2)
Author: Anuj Mittal <anuj.mittal@intel.com>
Date:   Tue Feb 20 08:33:45 2018 +0800
可以看到,当前版本已经是 tag rocko-18.0.2 之后的第 105 次 commit ,可以选择将版本回退到一个特定的 tag 。然后初始化编译环境:
$ source oe-init-build-env build
以后所有编译生成的文件都位于 build 目录下,然后开始编译:
$ bitbake core-image-sato
默认会构建出一个基于 qemu 的系统镜像。